Over the last couple of weeks I've been focused on clearing and planting new pots for both the garden and the allotment. Despite having 2 allotments my garden at home is a bit of a disgrace! Mr L doesn't want to have a proper garden and so at the front it's covered with slate and while I did have some pots I forgot to water them during the summer and they all ended up drying up. I decided to use grasses as my focal plant and build around them. I love the ornamental cabbages and used them across all the pots and I added solar lights to brighten it up in the evening.
I'm really pleased with how they turned out, I think they're really pretty; the purple in the cabbages and the purple fountain grass (them main grass in the top left picture above) really compliment the slate in the garden. Both of these arrangements are close to the house and I'm thinking about moving the one in the top right closer to the fence.
 In the allotment I have planted the table outside of my shed with a heuchera, some Christmas roses, 2 white cyclamen and some ivy. This table already has a hellebore in it but I think that one is pink, rather than the white of the Christmas roses but it should still look nice against the heuchera and I could add some pink cyclamen to balance the colours if I think it needs them.
In front of the table I have 2 pots that I've again planted with a mix of grasses and ornamental cabbages. I've used primula to fill the gaps and ivy to spill over and mirror the planting table; I've also used a yellow capsicum for colour; I don't know if it will overwinter but I think it's really striking and the clashing colours against the purple grass.
I have moved the fig, peach and lemon trees into the polytunnel to overwinter. I know the fig is hardy but I think it fruits better if I've had it inside and the peach needs to be inside to avoid peach curl in the spring. I'm also assuming that the lemon tree would be better indoors. I've also brought in my wisteria which is still quite small and in a terracotta pot so again, while I know it's hardy I wasn't sure if it would survive the winter outside.
Every year I also give the polytunnel a good clean. It's always amazing to me how much dirt is collected on the floor; I usually sweep it up but it's usually quite hard. This year I tried using a trowel and dustpan which was very successful. I also gathered up the old and broken pots to throw them out. Unfortunately they can't be recycled and so I can only throw them away but I have used them until they're beyond being used any more. I have still got a big stack of pots under the staging that I'll use or give away. It's very difficult to keep use of pots to a minimum when every time you buy a plant it's in a pot that can't be recycled.
A nationwide pot recycling scheme is being launched, garden centres can join to recycle pots and many of the plant=carrying trays for reprocessing into other products. You can find out more information about it in the following link. http://tinyurl.com/y7pplrxz
 I've also been busy planting my winter onions in the bed that I had my potatoes in. There is still a pepper plant in there that has 1 last pepper on it. I don't know if it will ripen, or survive if there's more frost but I didn't want to pull it up while it was still growing and healthy. I may try potting it and putting it into the polytunnel to see if I can overwinter it.
Along the side of the bed I've also planted approx 50 more onion sets in pots ready to be planted into a bed in 86a when it's ready. I have some garlic that also needs planting into that bed and I think I'm going to have to put them into pots for now to get them going or it will be too late to plant them.
I still need to spend time clearing the paths and generally tidying up. I've neglected some of the weeding this year and I want to try and get back on top of it before next season starts. I'm also keen to sort out the fence between 85a and 84, which is extremely overgrown and because it's multiple layers of chicken wire it is impossible to clear. I want to take the whole lot down and re-do it with a single layer of chicken wire; which will be much easier to manage. I will have to wait until the perennials have died back and then I can get in to cut back the brambles before taking out the fence. This winter I need to get 86a sorted so this might end up being a job for next winter but we'll see how it goes.
I'll try to do better at blogging over winter and especially as I'm hoping to get things down on 86a, hopefully I'll have more to update you on that I have in previous years so until next time...
Happy Gardening x
Well here we are again at the end of the season. I had an interesting surprise when I got up to the plot yesterday; my neighbour had ordered herself some topsoil and ordered some for me too 😊 I wasn't expecting it but I do need it so it was a good surprise! I had to persuade Mr L to come up today and help me get it up the hill, I prepared the bed (cut out the membrane, stapled it to the side, covered the bare soil with cardboard) while Mr L brought the soil up. It took a whole bag to almost fill one of the beds so I'm going to order a couple more and fill the other big bed and top this one up.
I should also say that the first bed, which I mentioned last time, I planted with spring bulbs last weekend. I wanted to have a bed filled with mostly daffodils and tulips that I can use as a cut flower bed. I do want to think also about what I can plant for summer flowers that will fit in between the bulbs but my plan is that this bed will be for cut flowers.
I've been thinking about what I'm going to do with the rest of the plot. I think I can fit 5 more beds along the top. They will be smaller than the three I have so far because there won't be enough room for the same length and the 2' paths that I like to have around my beds. This means that the beds will be around 9' x 4'. This means that I'll need 10 more boards to get the beds reads for filling. I think I'll then need around 5 more bags of soil plus the manure to add nutrients for planting.
As you know I currently have a compost bin next to the shed but I've decided that I'm going to put the greenhouse there and then I'll move the compost bins to the opposite side of the plot. I will introduce a 3 bin system again, which I've found is very successful and produces a good amount of compost for the size of the plot. As a result of the way I've placed the shed and where I'm going to put the beds I'm going to have a big space in front of the shed. My thought at the moment is to make it a seating area with a fire pit; I do like having a fire and having a space to sit will be really nice. Alternatively I could put a flower bed there but it will be perpendicular to the other beds.
 In 85a I made a start clearing some of the beds this weekend. The onions that I put in over the summer haven't done well (I suspect because of the drought) and so I decided to pull them up and clear the bed. This bed will be for peas next year and so I thought I'd move the supports I made to the new bed. I've also placed bamboo canes along the whole bed because I'm going to use the same system again to grow the peas in the whole bed.
I'm not sure you can see very well on the picture but I've managed to get or 4 lines of bamboo between each blue hoop. Some of them will be right up against the hoop and the one at the bottom I've actually fastened to the hoop to stop it from leaning into the path. The first 3 have chicken wire to the top of the bamboo but then the next 2 only have it halfway; it will depend on the variety of peas that I choose for me to decide if I need to extend the chicken wire or if I can manage with a shorter support. I will also think about putting toppers on the canes to avoid any eye injuries; I'm very careful about toppers on canes because they can be really dangerous, especially some of the shorter ones.

I also started my annual clear up of the shed. I don't know how I manage it but this table particularly seems to end up covered and unusable for the majority of the season! I have tried to be a bit more organised this year; I've cleaned out an old tub and put all my plates and cups in it to protect them from anything that might seek refuge in the shed over the winter. I've also put a lot of my netting into some of the old bird seed tubs to try and stop the mice from shredding them again! I need to decide what can go into the new shed in 86a to try and clear some space and then I can clear the shelves in 85a. I also want to think about maybe putting a shelving unit in 86a so that I can share the plant food and bits like that between both plots; which will help me avoid having to come backwards and forwards between them for these things.
 I have been working on a project for the allotment society. Some pieces of wood were cut from some trees that had been felled and I'm using a pyropen to make lane markers and a sign for the gate at the clubhouse.
I made a decision not to smooth the wood itself before I started writing on it because I think it looks really good with the cut marks from the chainsaw, even though that did make it slightly more tricky in some areas for me. I have 6 more to do for each of the lanes that originally were just called A to G and we've named after various flowers or vegetables. I will treat them with some teak oil and then I think we'll also have to varnish them but I think they look really good; I'm pretty proud of myself if I'm honest!
To finish off this week I want to mention the coffee morning for Macmillan Cancer research that my lovely allotment neighbour put on. She got an extra piece of land behind her plot and she, with her husband Mike, have worked really hard to clear it, after it had been left to get quite overgrown. She borrowed 2 of the gazebo's from the society and raised £145 from everyone who came along. Mike guessed that around 30 people had come along and Sian had been super busy baking some really tasty treats, that were all vegan and gluten free so that everyone had the opportunity to eat everything on offer. Well done Sian and Mike! 💗
A couple of weeks ago I built my first bed for 86a; I had bought 8 13' boards with the intention of making 3 large beds (13'x4') that will go next to the shed. I needed to clear around the edges of the plot because the brambles had snaked across the plot from the outside and looked like they'd never been cut back!
Once I'd sorted all the brambles I moved the bed I'd made into the corner and then cut the membrane out of the middle and stapled it up the inside of the bed. My thought process here was that if the membrane is on the inside it should stop the problems I've had in 85a of weeds (mostly couch grass) growing up between the membrane and the board. 86a is also not very flat and so rather than having to dig down to flatten the bed bringing the membrane up inside means that when I put the compost in the membrane will hold it in place without it spilling into the path.
I removed the roots of weeds that had come to the surface (they often do this when you cover them) and put cardboard down to continue to supress the weeds. My intention is then to fill the bed with compost, which should be around 9" (the depth of the board). That should be more than enough to continue to supress the weeds under it. At the moment I've put a thin layer of compost down because I ran out of time. I manage 6 wheelbarrow loads but I think I'll need at least 12 more to fill it.
The compost I'm using is the free stuff that's available from our site; it comes from the council and it's basic garden compost. It isn't the best quality though, it's full of stones and there are weeds growing over the top of it so there's a possibility that by using that I'm transferring weeds up into the beds; which is frustrating but unavoidable as I'm working on a budget so I can't buy bags of sterilised compost to use instead.
Mr L came up to the plot today to help me build the additional beds, unfortunately the flipping drills both gave out on us and so he was only able to build one more bed and help me to build the compost bin. It makes a big difference having him there, not just because I can get on with other jobs but also because it's nice to have someone else there with me to talk to, and it motivates me having someone else to work with. He wasn't up for helping me getting the compost from the pile though so he left me to that!

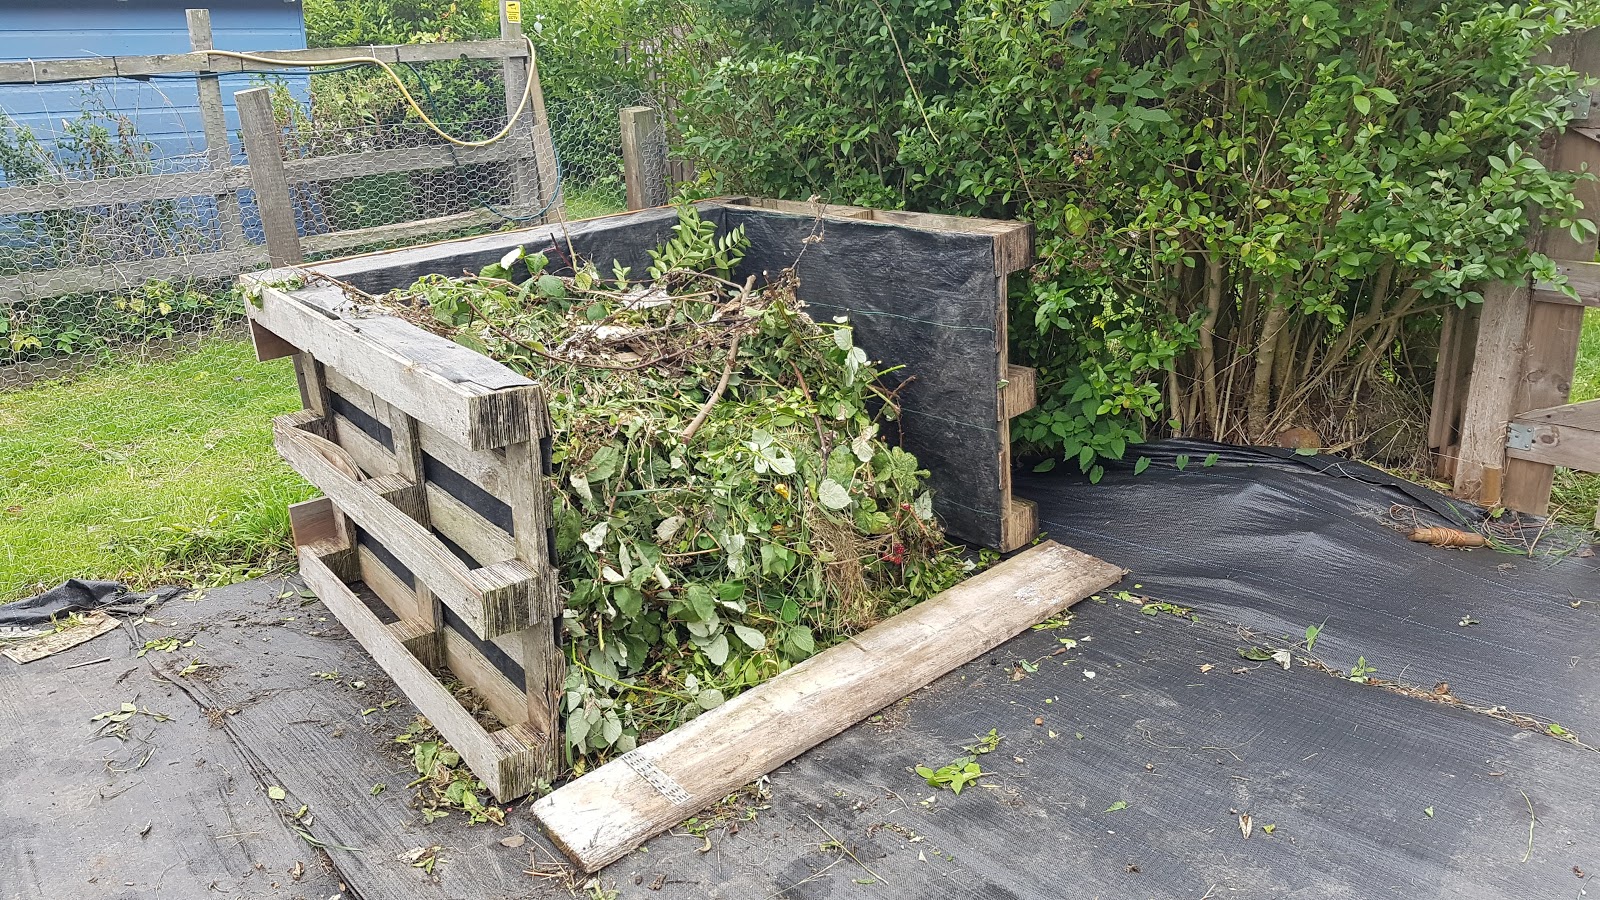
As a result of having to clear the edges of the plot again I ended up with a big pile of green waste that needs to be composted. The compost bin in 85a is overflowing because of the stuff I've already cleared from 86a so I decided that I needed to build a new compost bin. I had some pallets that had been used as a fence for a couple of years and I removed a few weeks ago. I covered them with some leftover weed membrane and fastened them together into a basic bay. I had to use some of the wood that I'd removed from the plot originally to fasten it together and I'm going to use a bit of old scaffold board that I'd removed from the old beds to hold them together; either across the top or along the front on the bottom, which will make a lip at ground level.
At the moment I've positioned this immediately on the right as you enter the plot but I'm not sure that will be its final resting place. I like to run a 3 year composting system which requires 3 bays and unfortunately this space doesn't have any more room for any more bays. It is a temporary measure because the pallets really are scratty so they won't last very long but it keeps the stuff I've gathered contained in one place until I can sort out some proper bays.

In 85a you might remember that I have this little planting table in front of the shed. I have some hellebores in there but with the hot weather they really didn't fare well. I did end up with lots of little clover-like weeds covering the majority of the surface. It was a nightmare to clear but I pulled most of it up before effectively raking over it with my fingers and clearing it. I think it looks so much better and now I need to decide what to do with it. My plan is to look at a bench to put in this area so I'm going to have to move this to somewhere else if I do that. If I do put a bench in this area (and in front of the other shed in 86a) I'm going to use a block of wood on the inside of the shed and fasten a bolt through the bench and shed and into the wood on the inside to stop it being stolen as the last one was. I also want to look at ways to put more seating in both plots in different areas but I will be more thoughtful about security if I do that because it's really annoying to have them stolen - even if you've got them for free from Freegle!

We're also at the end of nesting season and so I've made a start on cutting the hedges. It's important to remember that hedges should not be cut between March and September to avoid disturbing nesting birds. It is illegal to knowingly disturb nesting birds and even by inspecting the hedge you can do that so you shouldn't do anything until September when you can be sure they're gone.
I still have work to do on the inside of the plots and to reduce the height but they at least look better from the outside. You can see from the left picture that all of the stuff I took off of 86a is still there and needs to be taken to the tip. Most of the bricks that had been left on the plot I put outside and invited other plot holders to help themselves and thankfully the majority of them have now gone; so that's one less thing for me to have to deal with.
It was a slow start getting things sorted on 86a for loads of reasons but I feel like things are really starting to come together and hopefully by next season there will be enough beds in place to have a really good return from both plots.
Until next time
Happy Gardening x
In the last couple of weeks I've been working on getting jobs done to get me properly prepared for a good first growing season next year in 86a.
I had managed to get a free shed pretty early on but the roof was completely shot so what little roofing felt was left I removed and then I had a while before I could get it fixed. I got a brand new roll of roof felt from freegle, which was slightly damaged but easily cut out. I've never done a shed roof before but because the roof isn't too big it only needed 2 pieces and I think it looks good. Because it's an apex roof I'm going to put guttering at both sides and then bring it together at the back. I have another wheelie bin that I'm going to convert into a waterbutt and then I need to think about doing one at the back of the greenhouse when I get that up to the plot as well.
The picture also shows where I've removed the pallet fence that was a bit tatty and replaced it with chicken wire. I will need to keep on top of the weeds that will try and grow up it but I'm going to try and train the brambles along there (while keeping the bindweed down) to get a good crop of blackberries.
Today I was focused on starting to make the beds. I have enough scaffold boards for 3 beds but I didn't have enough screws and blocks to make them all. I have made one 13'x4' bed and my plan is for all of my beds to be that size although I'm going to have to think about the space in front of the shed because that will be compromised by the shed being there. I might end up putting a bed along the front or I might take the opportunity to extend the seating area and maybe add a fire pit to sit around.
The beds are a bit bigger than the ones in 85a, which are 3' wide. I had some really good boards but a couple had rotted at the end and when we measure them they weren't quite 13' long so it was easier to cut three 4' lengths and discard the rotten end. I've also found with 85a that while I can lean across the whole bed I tend not to and would rather go all the way around. I therefore didn't see any reason that 4' beds would be a problem. I did consider putting chicken wire at the bottom of my beds to deter the moles from digging in the beds but over the last couple of weeks I've noticed holes in the top of the beds and I think the main culprit is currently voles, rather than moles and as such putting chicken wire in the bottom won't help me.

A funny thing I noticed the other day is that a sunflower had started to grow under the bird feeder. It's obviously from a seed that a bird has dropped so I've left it to grow. It's going to end up under the squirrel baffle so I'll have to tease it out to let it grow. I'm sure the birds and squirrels will eat all the seeds but I just thought it was funny that it had started to grow and decided to leave it there.
I have got another bird feeder for 86a but I'm going to think carefully about where I'm going to put it. I want to try and avoid having it somewhere that the squirrels can easily jump to it from something else. I'll put a squirrel baffle onto it and I'll probably end up with squirrel proof feeders but one of the things I've seen with my current feeder is that they actually jump from the wooden arch to the feeders! Since I've introduced the squirrel proof feeders the food has definitely lasted longer because in addition to the squirrels not being able to get to it, the bigger birds can't get it either.
I have made a slow start in 86a for very many reasons. I do think it's important that the many years of weeds are properly suppressed; many people don't really understand the no-dig principles and think I should have dug the whole plot over properly. I have stuck to my guns and left the plot covered. I still have the edges that I need to clear again but it's much less work that it would be to try and keep strimming the whole plot. I do have lots of dips and troughs on the plot; and in hindsight I wish I had rotivated the whole plot. In most cases I would say not to rotivate a very weedy plot. However as I was planning to cover the whole lot it would restrict the re-growth of the weeds and have sorted out the uneven ground. I'm going to have to try and sort it out after the fact now, probably by using bark chippings. If anyone has any thoughts on how to fix it, without lifting all the membrane.
Until next time...
Happy Gardening! x
I can't believe how long it's been since I last blogged, I have been very remiss in the last few weeks partly because I haven't been doing much on 85a (it's pretty much looking after itself now) and I've not managed to do much on 86a either!
Before I went on holiday I bought these watering globes from the poundshop. They were packs of 2 and are supposed to keep your pots watered for up to 2 weeks. I had a couple of plants that have been struggling in the hot weather so I was worried about being away for a week without things being watered. The only downside of them is that they have to be filled from the bottom so you have to take them out to fill them. I was running them under the hosepipe and then I realised that I could much more easily just dunk them into the waterbutt to fill them - doh!
They do seem to have helped and my hanging baskets really have benefited from having them. I'm going to go back and see if they have any more and I'll happily buy another 10 packs (so 20 more globes)! Next year I'll ensure that all of my pots have a space for the globes to be included when I'm planting them.
I also cut off most of the leaves from my tomato plants before I left to help my tomatoes to ripen. At this time of year it's good to create as much airflow through the plants as well which helps to guard against blight. My neighbour was turning on the water in the polytunnel on a regular basis so these plants were still watered while I was away.
The polytunnel also has a pumpkin plant that I had left over and I just popped into the bed at the far end. It grew across the path, under the staging, up the side and over the top of the staging again! I cut off the foliage after the fruits so that the plant could concentrate on the fruit instead of lots of additional leaves and it has 2 good sized pumpkins under the staging.
 The grape has really done well this year as well, I suspect partly because of how lovely the weather has been. I am impressed that it's really only its second year and I already have fruits and a really healthy plant, I think I need to prune it again so I need to work out the best time and way to do that.
The sunflowers have flowered and are looking amazing but the plants are too heavy and have been blown over in the winds. I'm going to have to remove them all because they're falling over and damaging the carrot fly netting.
I've been busy harvesting my crops and I've already had quite a lot of lovely tomatoes. I harvested the potatoes from the bags and they were really good sizes and very tasty. I've also had loads of autumn fruiting raspberries and blackberries. Today I harvested a sweet red pepper and some carrots as well so I'm looking forward to having them for my tea tonight.

Over the summer I've had some lovely flowers blooming both in the beds and in the pots. I planted a cordyline in the centre of the pot and surrounded it with giant petunia. I didn't realise they'd get quite this giant but they have looked amazing all summer; they did struggle in the heat and they've gone a bit leggy now. I did consider chopping them back but I've not been brave enough to do it; they are still flowering and I'm worried that if I cut them back I'll lose all the blooms and they won't recover.
In 86a I have finished painting the shed and I've put it up on a bed of the carpark matting that I used for the shared path which I have then filled with gravel. I still need to sort out the roof of the shed but I have got some roofing felt now so it's just a case of getting a dry day to get it done.
I also had 8 thirteen foot scaffolding boards delivered to make beds with. They will make 3 beds, which will be a good start for now. I need to measure my plot properly and then make a proper plan. I've put the shed against the fence closest to 85a but in the middle of the plot because that's where the ground was flattest and I also wanted to create some shade so having the shed against that fence means that it will cast shade in the afternoon and that will give me somewhere to hide from the sun when it's warm; something that I don't have anywhere in 85a!
I am going to try and get back in the habit of blogging every week but until next time...
Happy gardening x
Unfortunately I wasn't very well this weekend so I only managed to get up to the plot for a couple of hours this afternoon. Of course yesterday it was the World Cup Quarter Finals and for anyone living under a rock England won 2-0 against Sweden, meeting Croatia in the Semi Finals.
I had an England flag that I bought for the allotment but haven't had a chance to put it up before now. I used an old wooden curtain rail and stapled the flag to it before I screwed the rail to the wooden arch. As you can see from the picture it was a bit cloudy today and it's apparently forecast rain tomorrow (fingers crossed).
Due to various things I hadn't been able to get to the plot in the week so the things in the pots and hanging baskets were looking very sad, including everything in the polytunnel, although everything in there have gone mad anyway, there is a pumpkin in there that has sprawled right across and under the staging and all of the tomatoes are looking massive, although a couple look a bit scorched on the ends of the leaves. I'll have to try and get up this week to give everything a good soak, especially if it doesn't rain.
 The good news is that after all the messing about last week with the new water butt I managed to get the leak sorted so I've been able to get it filled and in place at the back of the polytunnel. If we do have a hosepipe ban I will at least have 3 full water butts to be able to water the things in the polytunnel. As I understand it, even if there is a hosepipe ban one of the things you are allowed to do is fill up ponds so long as it has fish or wildlife in it. I currently have masses of tadpoles and a few frogs that are keeping cool in there. I pretty sure there's also at least 1 newt and so I do need to keep the pond topped up. I filled it up today because it was very low so I'll keep an eye on it and see how long it takes for it to start to evaporate again. I also noticed that the pump of the fountain was also a bit lower than usual so I might need to replace the battery in that next weekend as well.

A couple of weeks ago I harvested all of the onions, some of them were still upright and probably weren't really ready to be harvested but some of them were splitting and I wanted to get the bed cleared for my summer onions. Even though I've left them to dry for a couple of weeks you can see from the top pic on the left that some of the stalks were still quite green when I cut them so I'll need to use those ones first to avoid them going bad.
On the plus side my garlic is looking really good, I've got 14 bulbs in various sizes but they've all got clearly defined cloves. I'm really pleased given that it's the first time I've ever tried to grow it. These are hard necks but next year when I have the 2nd plot I'll be able to do a whole bed of garlic so I'll probably do a mix of hard and soft neck to enable me to be able to have enough to use all season. I'll also have at least 1 bed of winter onions but as I harvest the garlic I'll plant more summer onions so hopefully end up with enough to last me for the year.
Of course that's assuming that I have the beds in place before autumn when I'll want to be planting them, which is my plan. I'm also planning to have a bed of asparagus, which will need to planted in April so I'll leave the membrane on that bed until I'm ready to plant them and then I'll pull it up, remove any roots that have made their way to the top before filling with a good depth of compost and manure. I've been busy reading what I need an funnily enough I watched the A-Z of gardens on catch up this morning and it happened to be A, and they did asparagus! It looks fairly easy to do but I'll be sure to take photos or a video when I do it.
 As I don't have a lot to talk about in relation to gardening itself I will just take a minute to tell you all what I use for sun protection. It's really important to be protected from the sun, even when it's not bright sunshine because you can still get burnt but it's even more important when it's so bright and sunny.
I like to use ultrasun, which you put on in the morning and then it stays put all day. I use a minimum of factor 30 and normally use a sports spray, rather than one of the cream ones. The sports sprays are good because they don't come off if you're sweaty and they're a nice consistency. You just spray it on and give it a quick rub and you're set for the day. I also use the factor 30 face cream every day as my moisturiser. You can get it online quite easily for just over £20 and you can also get factor 50 for the kids. Littlest L uses it every day and can now put it on herself before school. She's very sporty so it's not unusual for her to be out all day at sports events with school and I'm completely comfortable that she's fully protected.
I hope that's useful for you but until next time...
Happy Gardening x
After a couple of weeks with no rain it was announced on Friday that Northern Ireland have introduced a hose pipe ban. I'm pretty sure that England will follow suit if it doesn't rain soon. We've already been asked to think about reducing water consumption and to take showers rather than baths etc.
It is true to say that the majority of plants planted outside don't actually need lots of additional water. In most cases watering with a hosepipe doesn't actually do a lot for the plants anyway. If you don't water for long enough it encourages the roots to come towards the surface where they're more likely to be fried in the heat and actually not watering encourages plants to reach down into the subsoil for moisture, which is where the majority of the nutrients are anyway.
My main concern about a hosepipe ban is my pots and the plants in the polytunnel. I have 2 water butts already but I had a spare wheelie bin and decided to make it into a water butt a while ago, I just hadn't got around to doing it. Looking at the weather though I decided that I needed to get myself sorted and make the stool for it to stand on and get the tap on.
I had some planks from when I cleared 86a that I used to repair the stool for my other waterbutt and then I used another one to create a new stool for the new water butt. For anyone who is wondering why I need a stool you can see in the main picture that the tap needs to be as low on the bin as possible which means it needs to be raised from the ground to enable you to get a watering can under it.
As you can see from the little picture I made a complete mess of getting the tap in. I put it in place and filled it but it immediately started leaking. I therefore had to empty it (not a problem when I have a lot of things to water) and take the tap out again. I climbed inside the bin with the tap in place and could see that I'd made the hole slightly too big and so I put a bead of silicone around the thread of the tap on the outside. I then put the tap into the hole and put a bead of silicone around the hole on the inside before tightening the screw. I'm hoping that will therefore fill all of the gaps and stop it from leaking but I'll leave it for at least 24 hours before I fill it again. If I get it over the tap and it doesn't start to leak I'll then fill it to the top and start using that, particularly in the polytunnel. I was given a kit to stick to the polytunnel for collecting water (essentially a mini gutter) which I'll also put in place to feed into the water butt if it does ever rain!!

In 86a I made a start in painting the shed, I decided that I did want it the same colour as the one in 85a. I thought it would be easier to paint it while it was laid on the floor and the weather was so nice that I was able to paint 2 sides of it, unfortunately I didn't have enough paint to do it all so I've just done the 2 sides and then I'll have to do the rest next week.
I also had to pull up some matting that I'd put down on the path which I'm going to use as the base for the shed and maybe even the greenhouse when I bring it up. Everyone keeps commenting that they don't think it will be good for under the shed but I can't see why not. It's strong enough for cars to drive over and will raise the shed from the ground to avoid it from rotting from underneath. Ideally of course I'd have slabs but I haven't been able to get any so this is a free option that I'm going to use. It will also enable me to map out where the greenhouse is going to go so that I can then work out where the beds will be.

While I was working on the water butt I found this little guy again, he was pushed up against the horrible fence (that I talked about last week) and all curled up because that's where I was working. I moved him back into the hedgehog house which I'd packed full of old leaves from the pile at the bottom of the hill. I made sure to point the house towards the gate this time because whilst I'm delighted that he's on my plot I wouldn't want him to struggle to get out if he wants to. I'm also going to look at putting some access points into the other fences to allow him to move freely around the plot in future.
I have also been enjoying watching the fledglings using my feeder. They are all still really small and you can see when the parent birds come as well the little ones cry at them to be fed! I've made sure to have lots of water available for them too. I have a good sized plant pot saucer that I've filled with water and put under arch, next to the kiwi, so that the hedgehog can use it as well as the birds. I've seen quite a few birds drinking and bathing in it already. The little bird bath is really nice but unfortunately it's very shallow and it only takes one bird to bathe in it and the thing is empty!

During the week I was up at the plot quite late into the evening, with the weather being so good a few people were up there and so we were having to take turns for the water. I ended up sitting with my neighbours for a chat and a drink and just before we left I went to have a look and see if the lights had come on. It was actually quite dark when I took the picture but my camera adjusts to make it look brighter but I do think it looks really pretty and I'm really pleased with it. I also found the numbers I bought ages ago but had lost so never put up. There were 2 screws missing but there was still enough to get them up and I think it looks really smart. I also put up signs to say that the plot is covered by CCTV which hopefully will keep people off my plot.
To finish this week I have some flower news, the lily in the pond has come into flower and looks really pretty. It's a white flower with a bright yellow centre and is sitting beautifully on the surface of the pond. The new flower bed is also in full bloom and looking amazingly like an English country garden. I have harvested all of the sweet peas that were flowering today and some of the cornflower to make a little (and very fragrant) bunch in my living room. The sweet peas are a mix of pinks and purples and the cornflower are pink and blue so they all look really lovely together.
I do hope we get some rain this week, in the nights rather than during the day, to give the plants a good soak but otherwise we'll just need to keep conserving water as much as we can.
Until next time then, Happy Gardening x

 In the allotment I have planted the table outside of my shed with a heuchera, some Christmas roses, 2 white cyclamen and some ivy. This table already has a hellebore in it but I think that one is pink, rather than the white of the Christmas roses but it should still look nice against the heuchera and I could add some pink cyclamen to balance the colours if I think it needs them.

 I've also been busy planting my winter onions in the bed that I had my potatoes in. There is still a pepper plant in there that has 1 last pepper on it. I don't know if it will ripen, or survive if there's more frost but I didn't want to pull it up while it was still growing and healthy. I may try potting it and putting it into the polytunnel to see if I can overwinter it.